Workbench
Workbench is the most core partial in Molecule, we imitate the wonderful design of VSCode Workbench based on React, and provide a simple Workbench UI to support extend, by which it could be fully customized.
Core Conception
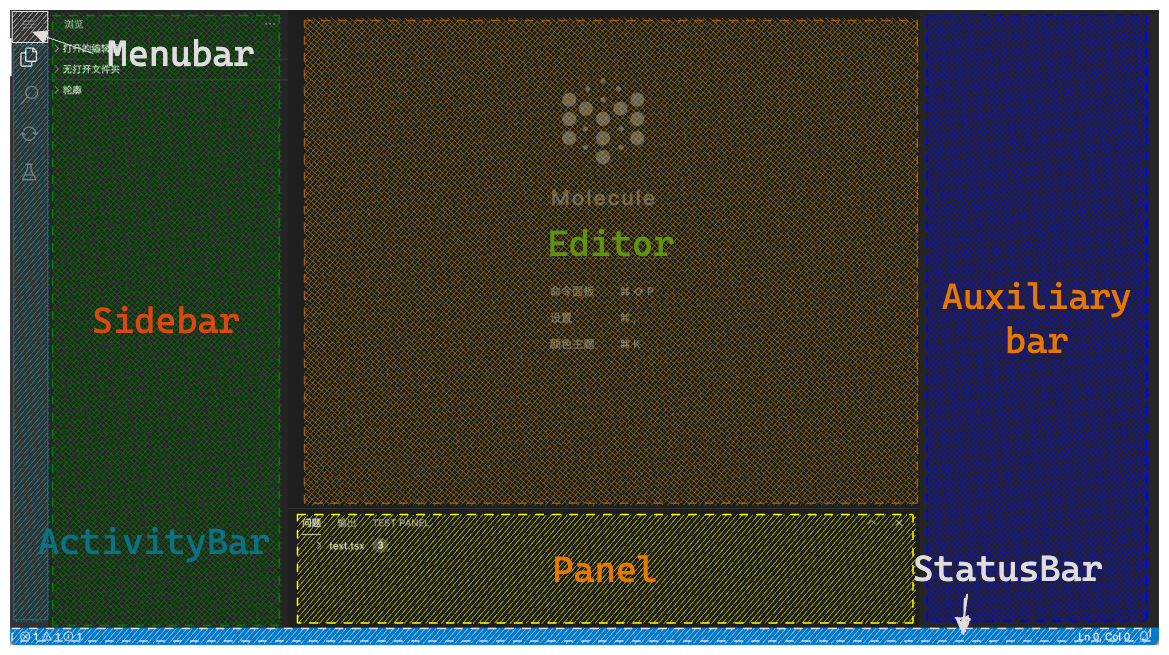
We divide the Workbench UI into seven modules, including MenuBar, ActivityBar, Sidebar, Editor, Panel, StatusBar and AuxiliaryBar(supported in v1.3.0+):
- MenuBar: For managing the menu bar in workbench, like File, Edit, Selection, View and so on.
- ActivityBar: For showing the active bar in workbench, like Explorer, Search and other bars. It's noticed that the ActivityBar should cooperate with other modules in general. For example, the Sidebar is going to show the correspond panel when switching the ActivityBar.
- Sidebar: In general, it's as a significant navigator part placed in the left of workbench like the built-in Explorer.
- Editor: For editing some data in tabs. In general, we can edit the codes in Editor. Or you can render your own editor UI. Molecule will have an Entry in Editor when without the tabs. Obviously, the Entry Page supports customized.
- Panel: In general, it's placed on the below of the Editor for rendering some panels like Problems, Output, Terminal, and so on.
- StatusBar: It's placed on the bottom of Workbench for rendering the status informations. For example, the Language informations of current file in Editor, or the informations about the Columns and Line of cursor, or the Notification.
- AuxiliaryBar: Generally, it's auxiliary for Sidebar. We could put some primary data in Sidebar, and secondary data in AuxiliaryBar.
tip
There is do not real function with the isolated module, which is only for pure rendering. If you want to achieve some specific commercial scenarios, you should integrate one with other modules, like integrating ActivityBar with Sidebar, or integrating FolderTree with Editor and so on.
Besides, for reducing the work of developing in UI, we have a majority of built-in components, refer to 参考 about the detail usage.
Extend Workbench
We will thoroughly indicate how to extend Workbench via Extension and the built-in APIs in this part.
To begin with a scenario:
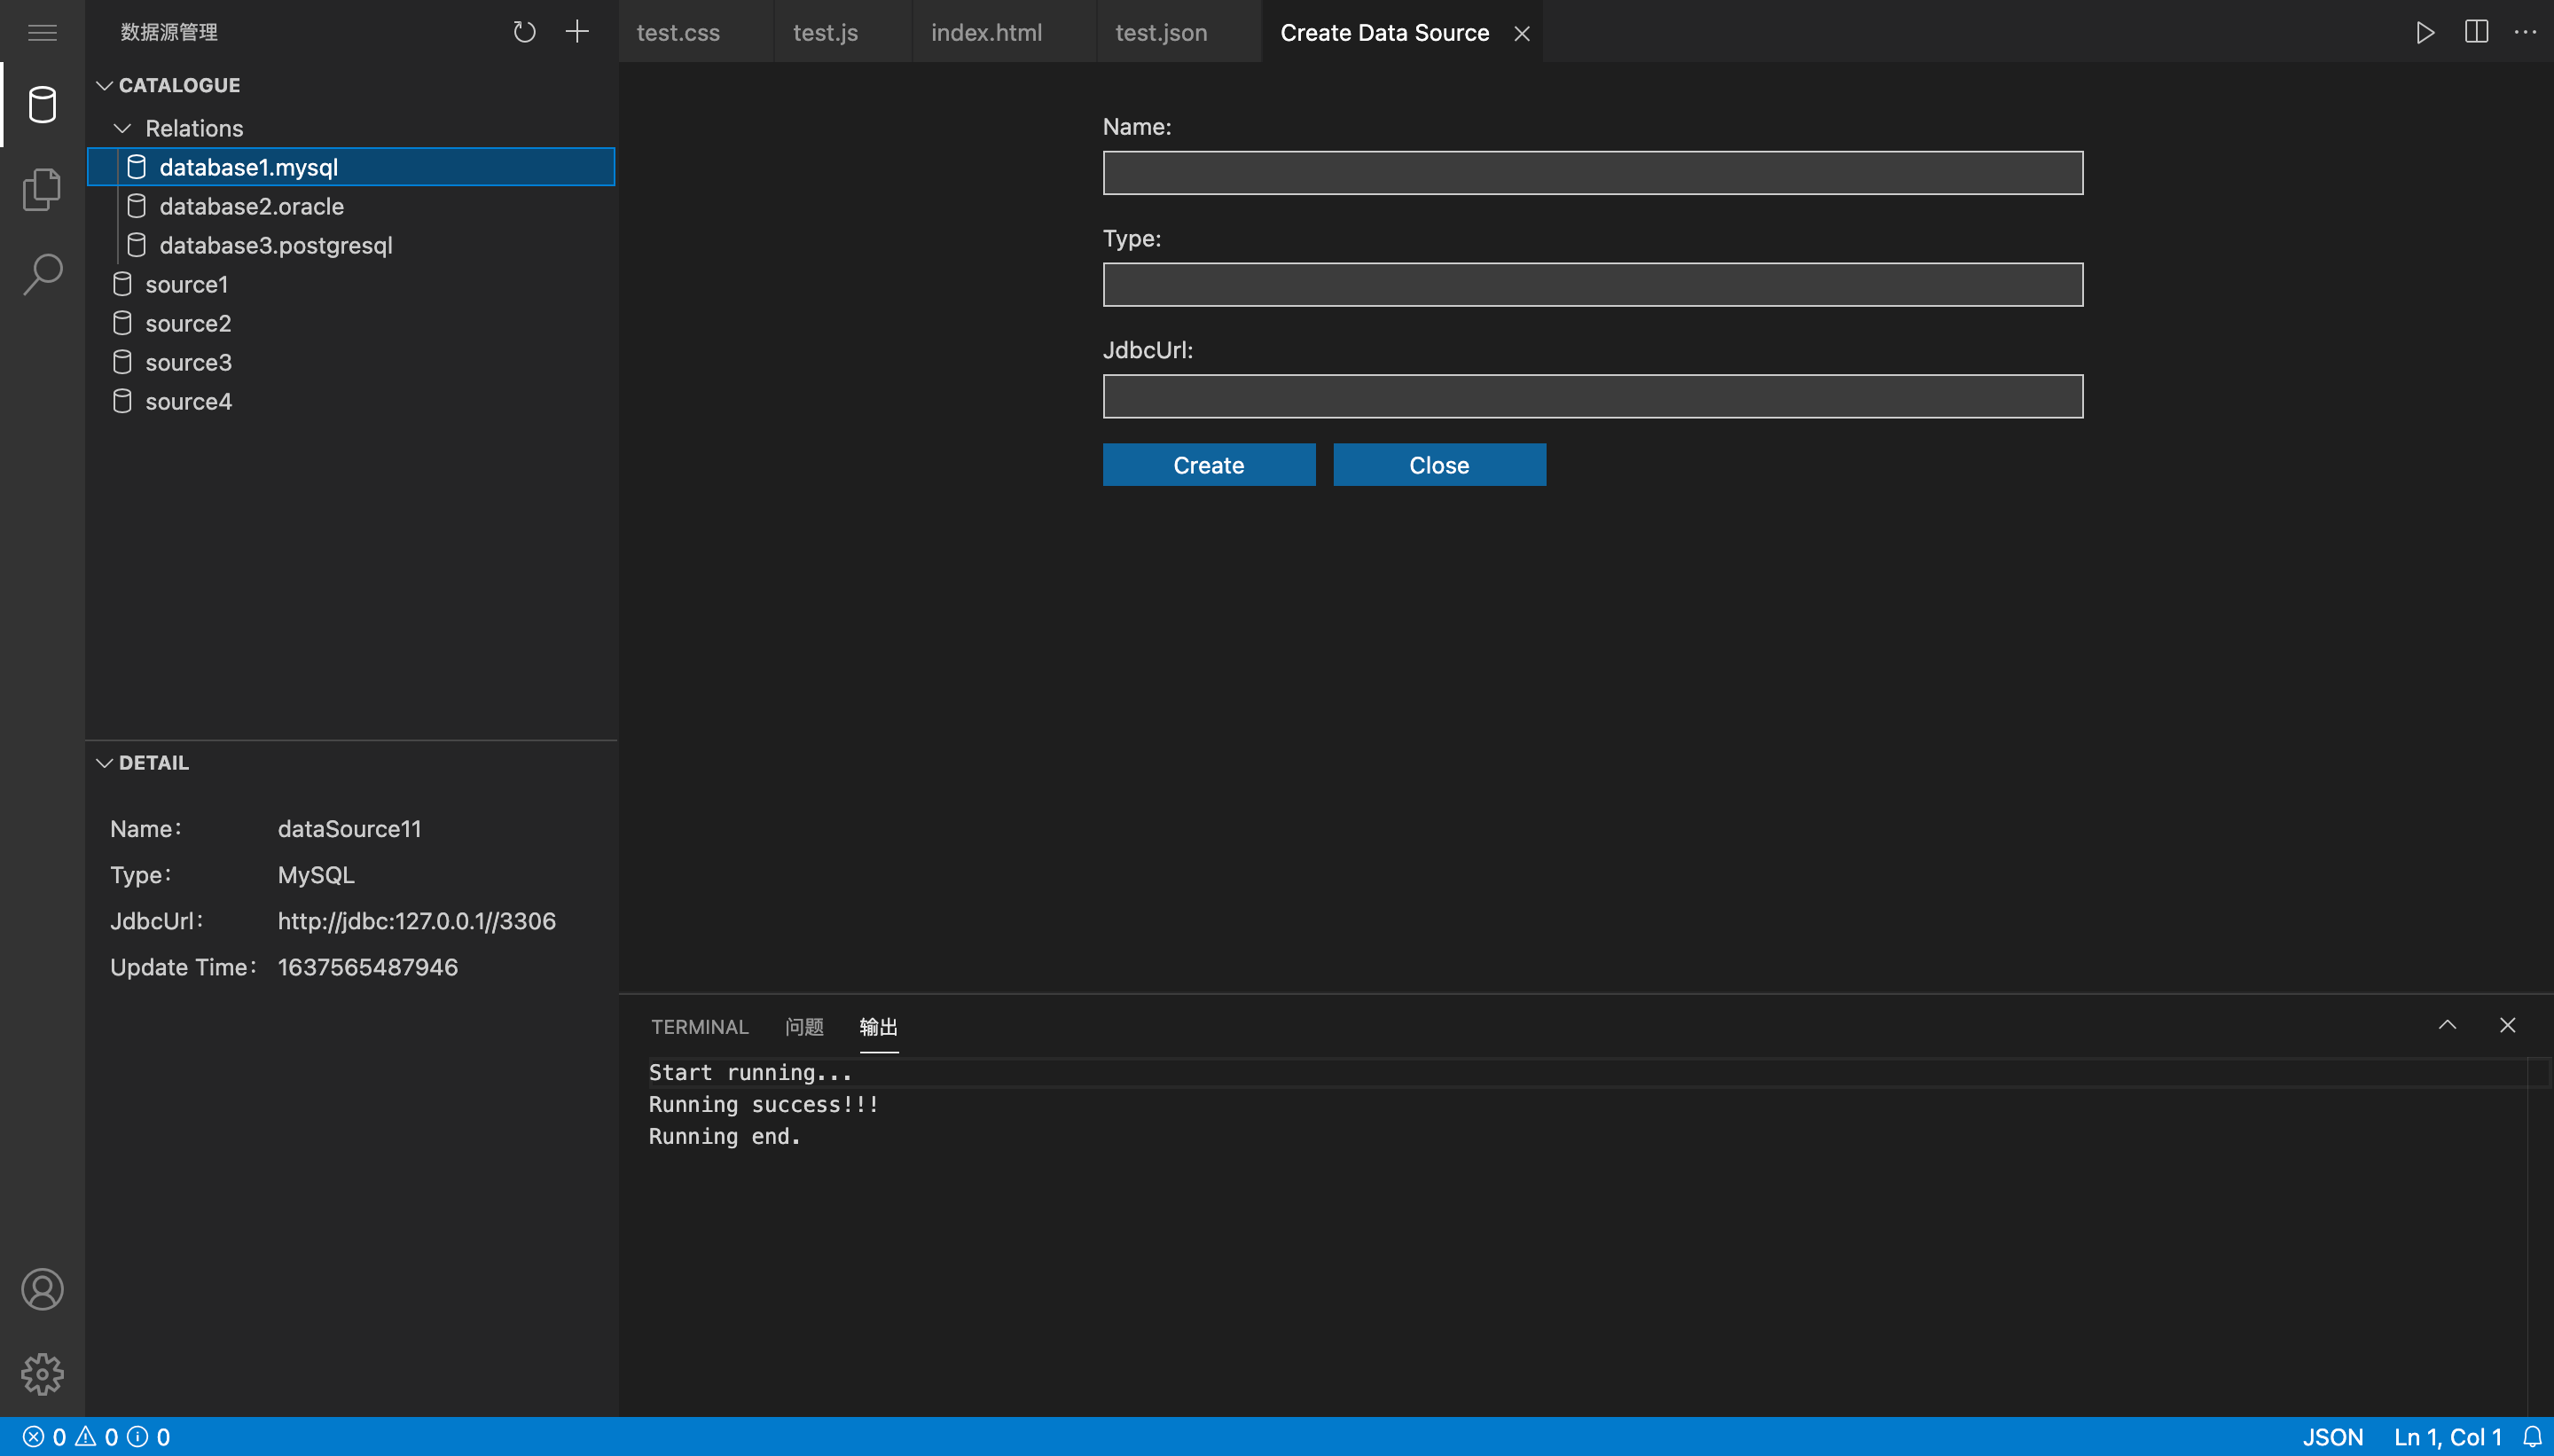
As the picture indicated, we imitate a simple UI for managing database. In this scenario, we will respectively extend the six modules, including the MenuBar, ActivityBar, Sidebar, Editor, Panel, StatusBar.
tip
The code demos in this part are all based on the molecule-demo in Quick Start.
First of all, we create a directory named dataSource inside extensions, which for storing some code related to this extension. And create the files named index.ts and base.tsx, for declaring the entry of extension and defining the public code. The directory is like following:
src/extensions/dataSource
├── base.tsx
└── index.ts
The code in index.ts is following:
export class DataSourceExtension implements IExtension {
    id: string = DATA_SOURCE_ID;
    name: string = 'Data Source';

    activate(extensionCtx: IExtensionService): void {
        this.initUI();
    }

    initUI() {
        molecule.sidebar.add(dataSourceSidebar);
        molecule.activityBar.add(dataSourceActivityBar);
    }

    dispose(extensionCtx: IExtensionService): void {
        molecule.sidebar.remove(dataSourceSidebar.id);
        molecule.activityBar.remove(dataSourceActivityBar.id);
    }
}
As the above, we declare a DataSourceExtension implemented the IExtension, and in the initUI method, we use molecule.sidebar.add, molecule.activityBar.add respectively to add a new UI component. And in the dispose method, we remove the UI component added in initUI.
After that, let's see how to extend the ActivityBar.
ActivityBar
We can add activity bar through the molecule.activityBar.add method. First, we define an IActivityBarItem object in base.tsx.
export const DATA_SOURCE_ID = 'DataSource';

export const dataSourceActivityBar: IActivityBarItem = {
    id: DATA_SOURCE_ID,
    sortIndex: 1, // sorting the dataSource to the first position
    name: 'Data Source',
    title: 'Data Source Management',
    icon: 'database',
};
The id property of the dataSourceActivityBar is DataSource, whose icon is database, and define a sortIndex property for adjusting the order of activityBar.
SideBar
Same as ActivityBar, we declare an ISidebarPane object named dataSourceSidebar in base.tsx, and use the molecule.sidebar.add method.
import DataSourceView from '../../views/dataSource/dataSourceSidebar';

export const DATA_SOURCE_ID = 'DataSource';

export const dataSourceSidebar: ISidebarPane = {
    id: DATA_SOURCE_ID,
    title: 'DataSourcePane',
    render: () => {
        return <DataSourceView />;
    },
};
The differences with the IActivityBarItem object is that we define a render function in Sidebar, which should return a ReactNode component. The DataSourceView component is a business component defined by our business.
The complete example can refer to molecule-examples
caution
The id property of dataSourceSidebar and dataSourceActivityBar in example are both used the DATA_SOURCE_ID, which mainly for rendering the content of dataSourceSidebar correctly in Sidebar when switching ActivityBar.
Editor
As the picture indicted, we open a tab named Create Data Source in Editor, but the content of this tab is a form for adding database. Same as above, we declare an IEditorTab object, and open it via molecule.editor.open:
import CreateDataSourceView from '../../views/dataSource/createDataSource';

export const createDataSourceTab: IEditorTab = {
    id: DATA_SOURCE_ID,
    name: 'Create Data Source',
    renderPane: () => {
        return <CreateDataSourceView />;
    },
};

export function openCreateDataSourceView() {
    molecule.editor.open(createDataSourceTab);
}
The renderPane belonged to createDataSourceTab is a customize render function for tab content, which returns a CreateDataSourceView component here. It's noticed that the default render of Editor is a monaco-editor view. If we want to modify a SQL text, we can execute like the following:
molecule.editor.open({
    id: 'test',
    name: 'test.sql',
    data: {
        value: 'select * from test',
        language: 'sql',
    },
});
We did't set the renderPane function here. You can refer to The first extension about how to open a code language.
Panel
As for Panel, we take a simple Terminal as example. We can create a folder named terminal inside extensions for distinguishing the database example above.
First, we declare an IPanelItem object named terminalPanel;
import { localize } from '@dtinsight/molecule/esm/i18n/localize';
import { IPanelItem } from '@dtinsight/molecule/esm/model';
import { Terminal } from '../../views/terminal/terminalPanelView';

export const TERMINAL_ID = 'terminalID';

export const terminalPanel: IPanelItem = {
    id: TERMINAL_ID,
    name: localize('demo.terminal', 'Terminal'),
    title: 'Terminal',
    sortIndex: 1,
    renderPane: () => {
        return <Terminal />;
    },
};
And then, we declare an implemented object named TerminalExtension in index.ts
import molecule from '@dtinsight/molecule';
import { IExtension } from '@dtinsight/molecule/esm/model/extension';
import { IExtensionService } from '@dtinsight/molecule/esm/services';
import { terminalPanel } from './base';

export class TerminalExtension implements IExtension {
    id: string = 'Terminal';
    name: string = 'Terminal';

    activate(extensionCtx: IExtensionService): void {
        molecule.panel.add(terminalPanel);
    }

    dispose(extensionCtx: IExtensionService): void {
        molecule.panel.remove(terminalPanel.id);
    }
}
We can add terminalPanel into Panel view via molecule.panel.add in the activate method.
The complete example can refer to Terminal.
StatusBar
The whole StatusBar is just used for operating on the IStatusBarItem data like creating, updating, deleting.
import { IStatusBarItem, Float } from '@dtinsight/molecule/esm/model';

const languageBar: IStatusBarItem = {
    id: 'languageBar',
    name: 'Javascript',
};
// Add language bar to the StatusBar right
molecule.statusBar.add(languageBar, Float.right); // Float.left/Float.right

// Get the language bar
const existLanguageBar = molecule.statusBar.getStatusBarItem(
    languageBar.id,
    Float.right
);

// Update the language bar
molecule.statusBar.update({ ...existLanguageBar, name: 'HTML' }, Float.right);

// Remove the language bar which the id is `languageBar`
molecule.statusBar.remove(languageBar.id, Float.right);
The Float.left/Float.right in code is used for setting the rendering position in the left or right of status bar.
We can customize Statusbar's content by render function, such as icons:
import { IStatusBarItem, Float } from '@dtinsight/molecule/esm/model';

const languageBar: IStatusBarItem = {
    id: 'languageBar',
    name: 'Javascript',
    render: () => <Icon onClick={onClick} type="bell" />,
};
MenuBar
We are integrate basic File, Edit, Selection, View, Run, and Help menus in MenuBar) as default. In general, we can extend something based on these menus directly:
activate(extensionCtx: IExtensionService): void {
    molecule.menuBar.append({
        id: 'menu.createDataSource',
        name: localize('menu.createDataSource', 'Create Data Source'),
        icon: ''
    }, 'File');
}
dispose(extensionCtx: IExtensionService): void {
    // Remove the menuItem which name is `menu.createDataSource`
    molecule.menuBar.remove('menu.createDataSource');
}
As the code indicated above, we add a new menu item named Create Data Source inside File. By the way, we can remove it via the molecule.menuBar.remove method. If we want to reset all data in MenuBar, we can use the molecule.menuBar.setMenus() method.
The layout of Menubar is in vertical mode as default. We can change it to horizontal mode by click View-> Appearance-> Menu Bar Horizontal Mode. In horizontal mode, we can set the logo in MenuBar by the logo property of MenuBar component.
The more detail about Menubar, please refer to MenuBar API.
AuxiliaryBar(Supported in v1.3.0+)
There are two modes for auxiliaryBar, which is default and tabs defined in IAuxiliaryBarMode.
The default mode is same as sideBar. You can call molecule.layout.setAuxiliaryBar to toggle the visibility for the bar.
The tabs mode is a little different with default. First of all, you call change the mode by molecule.auxiliaryBar.setMode. And once you change the mode to tabs, the interactive of auxiliaryBar will like a tab.
molecule.auxiliaryBar.setMode('tabs');
While setting mode to tabs, you should set the tabs' title too by calling molecule.auxiliaryBar.addAuxiliaryBar
molecule.auxiliaryBar.setMode('tabs');
molecule.auxiliaryBar.addAuxiliaryBar([
    {
        key: ~~(Math.random() * 10) + new Date().getTime(),
        title: '任务属性',
    },
]);
And whatever the mode is, the above code would never render the content area which we called children(treated as the React Component's children). If you want render children, you should subscribe the click event of auxiliaryBar and call molecule.auxiliaryBar.setChildren to render children.
molecule.auxiliaryBar.onTabClick(() => {
    const tab = molecule.auxiliaryBar.getCurrentTab();
    const TabContent = () => {
        return <div>Do anything you like</div>;
    };

    if (tab) {
        molecule.auxiliaryBar.setChildren(<TabContent />);
    }

    molecule.layout.setAuxiliaryBar(!tab);
});